wpf prism框架的基础使用
小占时光 2023-11-15 14:32:45 5814
介绍
prism 官网的介绍是:Prism是在WPF和Xamarin形式中构建松散耦合,可维护和可测试的XAML应用的框架。每个平台都有单独的版本,这些版本将在独立的时间表上开发。Prism提供了一系列设计模式的实现,这些设计模式有助于编写结构良好且可维护的XAML应用程序,包括MVVM,依赖项注入,命令,EventAggregator等。Prism的核心功能是交叉编译的.NET标准和.NET 4.5/4.8库中的共享代码基础。这些需要特定于平台的东西在目标平台的各个库中实现。Prism还将这些模式与目标平台提供了很大的整合。例如,Xamarin表单的Prism允许您使用一个可以测试单位测试的抽象进行导航,但是在平台概念的顶部和API上进行导航,以便您可以充分利用平台本身所提供的内容,但在MVVM方式。
目前开发中使用到的是WPF开发中,模块化开发。其中涉及到很多相关知识。
文档地址:➤ https://prismlibrary.com/docs/
官网地址:➤ https://prismlibrary.com/index.html
github:➤ https://github.com/PrismLibrary/Prism
一、创建项目添加nuget包
在Nuget 管理器中输入 “prism”,安装“prism.Core”,"prism.Wpf","prism.Unity",三个包。
修改App.xaml.cs 将app 父类修改成 PrismApplication
xmal 中也需要修改,不然会提示基类不一样。
修改完成之后,还需要修改删除 app.xmal 中StartupUri ,启动窗口修改到 app.xmal.cs 中 CreateShell 方法中
App中重要的几个方法介绍
CreateShell 设置启动主窗体,返回的是一个window类型。window1 则是启动后展示的窗体。
protected override Window CreateShell()
{
      return Container.Resolve<Window1>();
}
RegisterTypes 依赖注入使用,系统使用到的类都可以到此方法中注册。
protected override void RegisterTypes(IContainerRegistry containerRegistry)
{

}
ConfigureViewModelLocator Mvvm 模式中view和viewmodel 的指定,viewmodel不一定要以viewmodel结尾,看个人情况而定。
 protected override void ConfigureViewModelLocator()
 {
            base.ConfigureViewModelLocator();

            ViewModelLocationProvider.SetDefaultViewTypeToViewModelTypeResolver((viewType) => {
                var viewName = viewType.FullName;
                viewName = viewName.Replace(".Views.", ".ViewModels.");

                var suffix = viewName.EndsWith("View") ? "Model" : "ViewModel";
                var viewModelName = String.Format(CultureInfo.InvariantCulture, "{0}{1}", viewName, suffix);

                var assembly = viewType.GetTypeInfo().Assembly;
                var type = assembly.GetType(viewModelName, true);

                return type;
            });
    }
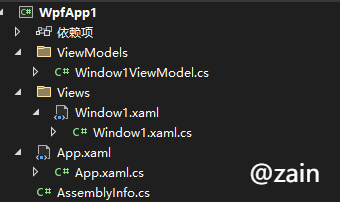
二、创建Views和ViewModels文件夹
在 ConfigureViewModelLocator 方法中约定Views 文件夹用于放view,而ViewModels文件夹用于放置 viewModel,且viewModel需要以model/view/viewModel结尾。
现在配置到此基本就可以了,以前版本中,会出现view 找不到viewmodel ,出现这种情况可以在xaml 中加上
xmlns:prism="http://prismlibrary.com/"
prism:ViewModelLocator.AutoWireViewModel="True"
三、ViewModel
对于wpf 不是静态应用,很多需要交互功能,和vue一样需要监听值的变化,界面ui也需要变化,所以viewModel需要继承 BindableBase
先将viewModel 代码贴出来,再来介绍后续内容
public class Window1ViewModel : BindableBase
    {
        public AsyncDelegateCommand TestAsyncCommand { get; set; }

        public DelegateCommand TestCommand { get; set; }

        private string title = string.Empty;

        public string Title
        {
            get { return title; }
            set {
                title = value;
                SetProperty(ref title, value);
            }
        }

        public Window1ViewModel()
        {
            Title = "viewModel test";
            this.TestAsyncCommand = new AsyncDelegateCommand(TestAsync);
            this.TestCommand = new DelegateCommand(Test);
        }

        private async Task TestAsync()
        {

            await TaskAsync();

            MessageBox.Show("执行结束");
        }
        private void Test()
        {
            TaskAsync();
            MessageBox.Show("执行结束");
        }

        private async Task TaskAsync()
        {
           await Task.Run(() => {
                // string + 很耗时
                string test = "";
                for (int i = 0; i < 30000; i++)
                {
                    test += "你好啊" + i;
                }
            });
        }
    }
未了测试是否能正确监听属性,加了一个 title 属性 ,单纯的为了测试viewmodel 是否绑定成功。
Xmal 界面属性绑定如下
<Window x:Class="WpfApp1.Views.Window1"
        xmlns="http://schemas.microsoft.com/winfx/2006/xaml/presentation"
        xmlns:x="http://schemas.microsoft.com/winfx/2006/xaml"
        xmlns:d="http://schemas.microsoft.com/expression/blend/2008"
        xmlns:mc="http://schemas.openxmlformats.org/markup-compatibility/2006"
        mc:Ignorable="d"
        Title="Window1" Height="450" Width="800">
    <Grid>
        <DockPanel HorizontalAlignment="Center" VerticalAlignment="Center">
            <TextBlock Text="{Binding Title}"></TextBlock>
            <Button Margin="50" Command="{Binding Path=TestAsyncCommand }">异步【asyncCommand】测试</Button>
            <Button Margin="50" Command="{Binding Path=TestCommand }">command测试</Button>
        </DockPanel>

    </Grid>
</Window>
在view 界面直接使用 Binding 即可,Binding 的用法还有很多细节,mvvm中很重要。
AsyncDelegateCommand
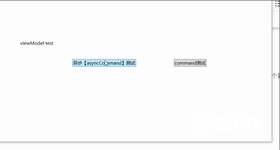
在viewModel 中有两个Command,一个是传统的命令,还是有一个是AsyncDelegateCommand,这是一个异步命令,可以使用wait 不会导致UI卡死。直接测试结果:
个人感觉相比于其他框架,prism 的模块化开发挺好用的,现在没时间弄写出来,以后再弄。
温馨提示prism目前已经收费
最后一次修改 : 2026/2/3 上午5:13:46


